
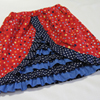
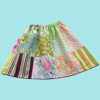


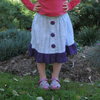

Yesterday, I showed you my latest refashion: turning a woman's dress into a little girl's dress, drawstring bag and hair tie. Today, I'll show you how I made the fabric flower hair tie.
After making the girl's dress, I had a strip of fabric left over from the bottom of the dress. For the fabric flower, I used the strip from the front of the dress. The strip from the back was used for the drawstring bag.
Once again, I've used this fabulous tutorial for a flower headband, written by Cass, over at Cass Can Sew. Head on over to see how Cass makes the fabric flower. Here's how I added an elastic hair tie to the back, instead of adding it to a headband.

- Neaten the ends of the strip.
- Place the fabric, with the buttonhole, behind the fabric flower.
- Sew in place.

Next step is to attach the elastic hair tie with a piece of ribbon.

- Thread the ribbon twice through the button hole, encasing the hair tie.
Secure the ribbon and hair tie, so it can't be pulled through to the front.
 The ribbon at the front...
 Fold the ribbon to the desired shape and secure with a few threads. Next time, I'll secure more towards the centre of the bow and less towards the ends, so the bow stands up a little more. Securely sew on your button and you're done.


I've made this fabric flower much larger than the two previous ones found here and here. I just used the strip of fabric from the dress, without really thinking about the size of the finished fabric flower. I was lucky! It worked well.
Thanks, Cass, for sharing your tutorial...
... Pam
Have you seen our ongoing Hair Accessories Link Party?
Pin It
Wow! I love this since I love hair accessories very much. Thanks for sharing
ReplyDeleteI'm your new follower on Linky. I'd love if you can follow me too :D
Thanks
Witha @ http://withapinkie.blogspot.com
Aah so that's how you do it! ;) Thanks for sharing this tip Pam!
ReplyDeleteI would not have figured that out in a million years, lol. I love the end result,...kind of reminds me that spring is on its way.
ReplyDeletethis is so adorable. I love the way you attached the elastic. Thank you for linking up!
ReplyDelete~Jenn
housewivesofriverton.blogspot.com
This is really cute!! Would love to have you link up again tomorrow!
ReplyDeleteThis is gorgeous. You make it look so easy. I'd love it if you stopped over to Whimsy Wednesdays and linked this up www.thenymelrosefamily.blogspot.com/2012/03/whimsy-wednesdays-1.html. I'm following GFC and LF.
ReplyDeleteReally cute and once again..you make me wish I could sew!
ReplyDeleteGreat tutorial Pam!
ReplyDeleteThanks for linking to a Round Tuit!
Hope you have a fabulous week!
Jill @ Creating my way to Success
http://www.jembellish.blogspot.com/
SO SO sweet!! :) This is a fantastic refashion! Thanks for sharing at oopsey daisy!
ReplyDeleteTurned out SO cute!! I wouldn't have thought to sew the elastic on..., very clever. Thanks for sharing with us this week.
ReplyDeleteThis is soooo adorable! I can't wiat to try this out. Thank you for sharing!
ReplyDeleteWhat a lovely idea i am going to try and make one. Until now i made such things only in smaller sizes for my some of my fiberart works. not for wearing ....
ReplyDeletemirjam
I was wondering if you would share with me how you made your flower.It is wonderful, I under stand how you made the hair tie, But I love the large flower you made too, Thanks sooo much
ReplyDeleteSherrie