


Take a man's dress shirt, combine it with a woman's blouse and you have everything you need to make a girl's dress... no need to buy anything.
I had originally intended on joining in with Project Run and Play for their Shirt Refashion, but I didn't finish in time and as I was initially working towards a deadline, I didn't have time to take photos along the way. As there isn't an exact science to refashioning, close up photos of the finished dress should be enough to show you how I refashioned the two shirts into this little girl's dress.

First step was to find a suitable man's shirt. A quick look through Mr TMW's wardrobe and I found a good quality 100% cotton dress shirt, that had once belonged to one of my sons. Mr TMW wasn't totally convinced when I told him he hadn't worn this shirt in ages, but on hearing that the finished dress would be worn by one of the little people in the family, he was happy to let it go.
I adored the woman's blouse, when I first saw it in a shop several years ago, and just had to buy it. Unfortunately, I brought home the wrong size and despite the fact that it was a stretch cotton, I couldn't fit into it. As I had already washed it when I discovered this, my daughter scored the blouse. Fast forward a few years and the blouse was returned to me, to add to my pre-loved clothing stash.
Even though the two were made from different fabrics, I knew the colour combination would work. I've thrown the label out, but I'm assuming the blouse is cotton/spandex, as it's very similar to my Zumba pants.

I modified the bodice from the Good Deeds Dress by Elysium. Although a pattern designed specifically for charity sewing, I won't be selling this dress, I've already made for a few for charity and will be making more, so I figure it's OK to make one for home use. You could modify almost any bodice pattern, as you'll be using the buttons already on the shirt to make the opening wide enough to fit over the head and shoulders.
The pattern I used, had a cross over front to allow ease of getting on and off. I redrafted the pattern front, making it one piece. When I put my new pattern front on the shirt, I placed it as close to the neck as I could and with the shirt buttons in the centre of the pattern.
If you are using a bodice pattern that has a back closure, you can probably omit the back closure, as you will be substituting with the shirt front. You will just need to ensure that the front shirt opening is wide enough to allow for easily putting on and taking off of the finished dress.
- Sew shoulder seams
- Sew side bodice side seams
- Attach an extra button, if necessary. I've added the top button. Because I didn't have the correct coloured thread, I didn't make a buttonhole. Instead, I sewed a press stud underneath the button.
To finish off the neckline, I used one of the button plackets from the blouse. After unpicking the button placket and cutting to size, it was like a large piece of bias binding. I simply sandwiched the bodice neckline in between the button placket and sewing from the front and close to the edge of the placket, sewed through all layers. I did miss catching one tiny section on the back and had to sew about 1" by hand... better than unpicking and making a mess on the front.

- Unpick the seam joining the sleeve to the blouse.
- Reduce the width of the sleeve by taking in the underarm seam.
- If necessary, shorten the length of the sleeve. (This was a very short sleeve on an adult, so will be perfect as is, without shortening.)
- Gather the top of the sleeve so it fits the bodice armhole.
- Sew the sleeve to the bodice and neaten edges.
I was super lucky, in that the original gathering stitches remained intact after I had separated the sleeve from the blouse and the sleeves fitted without adding extra gathers. What a fluke!!! I did have to stretch the sleeve a little, as I sewed.


There wasn't enough length in the man's shirt, to make the skirt of the dress long enough, so the first thing I did, was to cut a strip from the blouse. The strip was wider than the bodice, but narrower than the width of the shirt. Even if the shirt had been long enough, the light blue breaks up the dark blue and would have been a good addition.
- Gather one edge of the light blue strip, until it is the same width as the bodice.
- Sew to the bodice.
- Neaten the seam.
- Press the seam towards the bodice and topstitch.
- Cut the shirt to the length required. Do not unpick the side seams.
- Sew the button placket shut.
- Gather the top edge of the skirt, until it is the same width as the blue strip.
- Sew the skirt to the blue strip.
- Neaten the seam.
- Press the seam towards the blue strip and topstitch.
I'm positive I didn't stretch the blue strip, as I was attaching the skirt. However, it looks like I must have, as it's wavy. This sometimes happens when I make t-shirt dresses, too. Leave me a comment if you know how to prevent this.
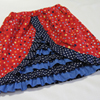
Ideally, I would have liked to have made a ruffle, for the bottom of the dress, but I didn't have enough fabric in either the skirt or blouse. I could have used fabric from my stash, but I was keen to see if I could make the whole dress without using any extra fabric. I cut the band from the sleeves and unfortunately, had to put a join centre front and back. To break up the blue skirt and band, I've added light blue piping, which I had to join a few times to get the length I needed from the blouse.
Here's the back of the dress...
and the front...
This would have to be one of my favourite refashions. I'm thrilled with how it turned out!!!
My latest refashion will be joining the 240+ dresses already linked up to the Dresses for Girls link party, here at Threading My Way and to the Clothes Recycling Collection over at Creating My Way to Success.
... Pam

Tweet
great job!I'm wanting to get into recreating unworn cloths when there's time lol!
ReplyDeleteHelen
This turned out great Pam! I really like the light blue with the dark. It softens the whole look.
ReplyDeleteDonna @onceupinasewingmachine.com
Wow that is one adorable refashion! I love the puff sleves. So cute!
ReplyDeleteI LOVE this dress - beautiful colors and shape. So funny he was not totally convinced he had not worn it for years - hahaha ;-)
ReplyDeletehow sweet. love the little ruffle =)
ReplyDeleteThis is so cute! You did a great job!!!
ReplyDeleteoh my! That is adorable! I love that you used two shirts. It is such a fun shape and I love the sleeves!
ReplyDeleteWhat a great refashion Pam, I am sure the little person will love it!
ReplyDeleteIt's turned out beautifully, and I love the two shades of blue together.
ReplyDeleteI love the gathered sleeves and the way you broke up the dark blue with strips from the light blue shirt. Pretty!
ReplyDeletePam that is a fantastic, fantastic outfit!! You clever lady combining the two shirts, will make a little girl very happy. Fiona
ReplyDeleteI love love love the dress! The piping and the waist ruffle are great details and make it so feminine! Great job!
ReplyDeleteThis is lovely! The detail in the shirt is lovely, what a great contrast to the stripe in the blouse. I love it!
ReplyDeletePS - what size dress would it end up being?
Deleteoh that is so sweet!
ReplyDeleteVery sweet and a really good result from combining two shirts.
ReplyDeletePam, you did it again! A beautiful fusion of clothes, the final result is beautiful. I just love it. I enjoyed seeing the photo of the two clothes with which you have initiated the project and the dress that you made at the end. The combination of colors is perfect for that dress and I really like the design. Thanks for sharing your creativity with us!
ReplyDeleteMarisa from
http://passionetcouture.blogspot.ca/
We featured you on our blog. Thanks for sewing along! http://shaffer-sisters.blogspot.com/2013/02/prp-sew-along-winter-2013.html
ReplyDeleteWith Love,
Jo
So cute! That's a pretty nifty refashion. Thanks for linking up!
ReplyDeleteMy favourite refashion so far. Looks so good!
ReplyDeleteLove it!!
ReplyDeleteI love that dress! Well done!
ReplyDelete
ReplyDeleteWhen my boyfriend broke up with me 4 weeks ago..
I did everything to get my boyfriend back but nothing worked.
I contacted a relationship doctor i saw online.
I told the relationship doctor everything,
He promised to fix my relationship problem.
I am the happiest lady on earth right now,
Never too late to fix your broken heart.
You can still get your lover back...
Fix broken relationship/marriage...
My relationship was restored as promised,
My Ex-boyfriend came back,
He promised never to leave me again
Everything happened just in 3 days..
I RECOMMEND YOU TO __________________
Thanks Robinsonbuckler11 (@) gmail com
❤️❤️❤️❤️❤️❤️🌹🌹🌹🌹🌹
Doris Bowen